Translate this page into:
Clinical Photography for Periorbital and Facial Aesthetic Practice
Address for correspondence: Dr. Akshay Gopinathan Nair, Ophthalmic Plastic Surgery, Ocular Oncology and Facial Aesthetics, Advanced Eye Hospital and Institute, Sanpada, Navi Mumbai - 400 705, Maharashtra, India. E-mail: akshay.nair@advancedeyehospital.com
This is an open access article distributed under the terms of the Creative Commons Attribution-NonCommercial-ShareAlike 3.0 License, which allows others to remix, tweak, and build upon the work non-commercially, as long as the author is credited and the new creations are licensed under the identical terms.
This article was originally published by Medknow Publications & Media Pvt Ltd and was migrated to Scientific Scholar after the change of Publisher.
Abstract
External cutaneous photography involves photographic documentation, which helps in treatment planning, documentation of facial features, teaching, publishing and pre- and post-procedural comparisons. The key is not simply documenting, but documenting it the right way and ensuring that photography is standardised and reproducible. In this review, basic photography techniques, standardised and reproducible angles such as frontal, oblique and lateral views and specific photographic angles for conditions such as facial rejuvenation are discussed. Use of photography accessories and a few tips on how to click good photographs in the examination room and how to achieve consistency in standardised photography are also presented. External photography in ophthalmic and facial plastic surgery like any other speciality too has standardised guidelines. Even small variations cause a drastic change in the photos and it's clinical and research value. Unless stringent criteria are met, the photographs lose their relevance and impact.
Keywords
Aesthetics
camera
dermatology
documentation
facial photography
guidelines
photography
plastic surgery
standardization
INTRODUCTION
Facial cosmetic dermatosurgery, unlike other specialties of medicine, is a very visual branch: What you see is what you get! And hence, the importance of clinical photography in this branch cannot be emphasised enough. A clinical photograph is an invaluable tool in the learning process of any medical practitioner by helping in documenting the progression of a disease or response to treatment over time. The importance of clinical photography in medicine, in general, is well known. Apart from teaching, research and medicolegal purposes, photography helps in treatment planning, self-assessment and also in marketing and advertising.[1] To objectively evaluate the outcome of any treatment or to record any change in a lesion, it is extremely important to document it at every visit. However, for this purpose it is imperative that the photographs are comparable and standardised. Small changes in patient positioning during photo documentation for surgical procedures can cause dramatic changes in the appearance of certain parameters, underscoring the need for standardisation.[2] This review article will discuss the basic techniques of digital facial photography and a few tips on how to achieve a certain degree of standardisation in photography techniques.
Compared to other subspecialities that deal with facial features, dermatology is unique. Photographs in dermatology not only have to capture the facial features and landmarks but many more details that are clinically relevant, such as skin texture, pigmentation and pore size, that are evaluated especially while determining the efficacy of facial resurfacing procedures.[1]
CONSENT
A written informed consent must be obtained from the patient before photography. The consent must include a statement that the photographs are a part of the patient's medical records and that the photographs may be used for presentations, lectures and presentations. The consent must be a part of the physical medical record. However, whenever reproduced, care must be taken that the patient's identity is not revealed through the photographs. Furthermore, clinicians must be sensitive to the fact that some patients may not want to be photographed and may not consent for the same.
PATIENT PREPARATION
Hair
The patient's hair must be tucked away or tied such that none of the facial features are obscured. The strands of hair that drop on the face from the sides should be neatly tucked behind the ear. It may be worthwhile in having a few disposable hair clips in the clinic, which should be used precisely for this purpose.
Make-up
It is ideal that any patient being photographed in the dermatologist's clinic should be make-up free. This is especially important when photographing patients who have undergone laser resurfacing procedures. Minimal make-up may be acceptable as long as it not overdone and distracting. Furthermore, any garments or accessories such as scarves that interfere with the required pose or the visibility of the area to be photographed must be removed or repositioned. Jewellery can be distracting and hence should be removed before photographing to maintain uniformity.
CHOOSING THE RIGHT CAMERA
A digital single lens reflex (D-SLR) camera is preferred for medical photography. This is because D-SLR cameras offer the option of changing parameters such as aperture, shutter speed and exposure – the three most important variables in photography. The aperture is a small set of blades in the lens that controls how much light will enter the camera and the shutter speed decides the duration for which this light enters in: Much like the pupil and the eyelid of the eye. The exposure of the camera is decided by the ISO setting. Aperture sizes are measured by f-stops. A high f-stop like f-20 means that the aperture hole is very small, and a low f-stop like f/4 means that the aperture is wide open allowing more light to enter. The shutter is a small ‘curtain’ in the camera that quickly shuts over the image sensor of the camera and allows light to shine onto the sensor for a fraction of a second. The longer the shutter allows light to shine the brighter the picture since more light is gathered. Conversely, a dark picture is produced when the shutter moves extremely quickly and only allows light to touch the imaging sensor for a tiny fraction of a second. The combination of aperture and shutter speed can be manipulated to produce bright, crisp photos.
Although, compact point-and-shoot cameras are convenient and portable, they do not allow manipulation of the parameters, thereby making standardisation and reproduction of the photographs difficult as point-and-shoot usually shoot in ‘Auto’ mode. In the ‘Auto’ mode, the camera decides the parameters on the basis of the ambient surrounding lighting. Initially, one must take a few test photos to decide on what would be the optimal aperture and shutter speed for the clinic.
Regarding megapixels, a camera with 5 megapixels of more is sufficient for medical photography. In D-SLRs, one can change the lens that can be attached to the body of the camera as opposed to point-and-shoot cameras, which have a fixed lens. An SLR camera can shoot very high-quality images, but it is bulky, heavy and expensive, whereas a point-and-shoot camera is light, portable and relatively inexpensive [Figure 1]. An intermediate-prosumer camera is also available: These cameras are easy to use point-and-shoot with features of D-SLRs (prosumer = professional + consumer). A more recent subtype of cameras is the mirrorless interchangable lens camera (ILC); also called compact system camera (CSC). These cameras have many features of D-SLRs including the ability to change lenses and can capture images whose quality rivals those shot through SLR cameras. The technical difference is that they are mirrorless: They possess the feature that allows lenses to be changed, but they do not have a mirror reflex optical viewfinder. These cameras are substantially cheaper and can shoot high-quality images, but are not as versatile and have lesser battery life as compared to D-SLRs. However, for the purpose of clinical photography, one may be able to procure a mid-to-high end ILC with great features for the cost of an entry-level D-SLR.

- Types of cameras – a digital single lens reflex (left) and a simple point-and-shoot camera (right)
LENS
Depending on the requirement, D-SLRs allow different lenses to be affixed to the camera body. These lenses are classified by focal length. This measurement, defined in millimetres, is the distance between the optical centre of the lens and the digital sensor when the lens is focussed at infinity. This distance relates to the distance that the camera must be from the subject for the subject to be in focus.[1] Lenses may either be fixed focal length lenses or zoom lenses, where the focal length can be changed manually to ‘zoom in’ to magnify the image. Using fixed focal length lenses offer the advantage of consistency each time while using the camera.[3] On the other hand, while using zoom lenses, one has to consciously ensure that the same focal length is being used each time the subject is photographed.
ILLUMINATION
Illumination is extremely important since this is the most important factor, which must be uniformly maintained to ensure consistency. Using a single, camera mounted flash can produce a very bright flash of light which blanches finer details on the skin and also washes out the skin colour and tone.[4] Therefore, for facial rejuvenation and resurfacing procedures, one must avoid direct flash and in order to capture facial redness and pigmentation one must use soft, even, diffuse light, devoid of shadows and sharp lines. Such type of diffuse lighting can be achieved by using multiple flash units in the form of soft boxes or umbrellas [Figure 2]. These soft boxes act as diffusers to remove shadows and offer even lighting.[156] At least two softboxes should be used and placed behind the photographer to obtain optimal results. The flash sources should be at 45° to the subject. If they are placed at 90° to the subject, the resultant shadowing can accentuate features such as the nasojugal groove.[6] Alternatively, a ‘speedlight’ may also be used. Speedlights are additional flash fixtures that are attached on top of the camera. The angulation, intensity of the light can be adjusted. More importantly, a diffuser can be used with these speedlights. Diffusers work by placing a translucent box in front of the flash. This softens the light and spreads it a bit more evenly than an undiffused flash head. The effect is similar to that of a softbox [Figure 3]. The concept of colour temperature must also be understood: Colour temperatures over 5,000 K are called cool colours (bluish white), while lower colour temperatures (2,700–3,000 K) are called warm colours. Ambient room light is usually yellow and can create warm overtones. Such lighting can affect photography as it distorts the skin tone. Therefore, the use of strobe lights or flashes is extremely prudent. The same subject shot with ambient room light and with diffuse light using softboxes can have starkly different results [Figure 4].
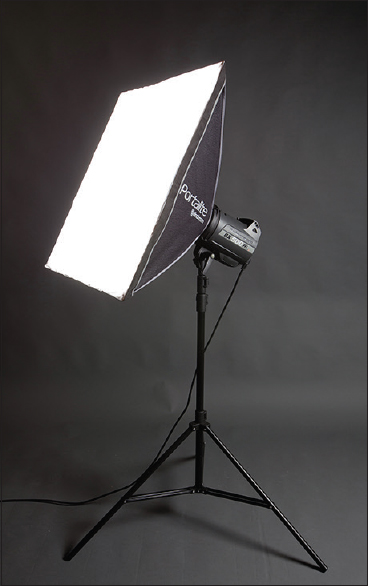
- A typical softbox. The lights within are called strobe lights and are closest to natural day light in terms of colour temperature
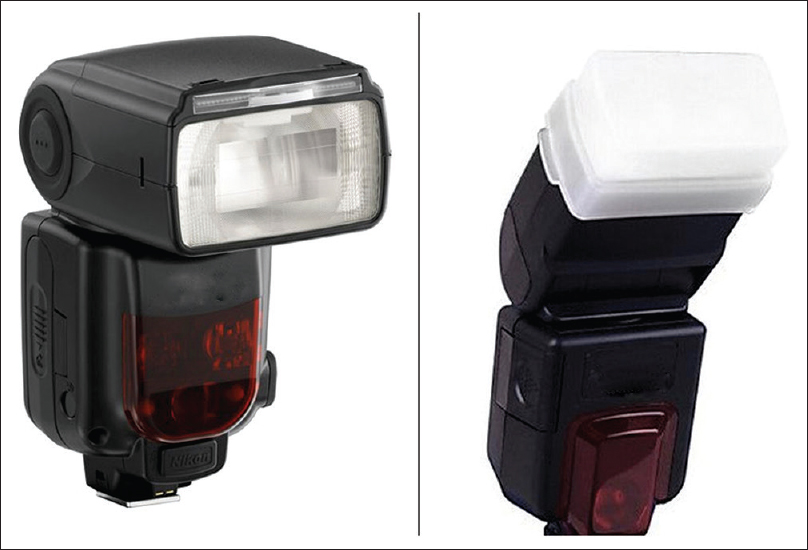
- A speedlight (left) and a speedlight with a diffuser over the light (right) that softens the harsh bright light retaining facial features
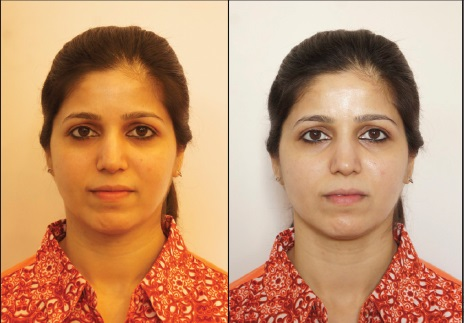
- Two different photographs of the same subject. The photograph on the left is shot with no additional lighting and with ambient room light. The photograph on the right is shot with softboxes. Observe the difference in the skin tone and exposure and the masking of the tear trough deformity in the photograph on the left
BACKGROUND
The background should be an even, neutral, nonreflecting, monochromatic surface. The preferred background colours are white, grey and blue. White or light blue panels on walls or the backs of doors can be adapted in places where photographs are taken (e.g., in the clinic). Having a fixed designated place in the clinic for photography with the same background also brings uniformity [Figure 5].
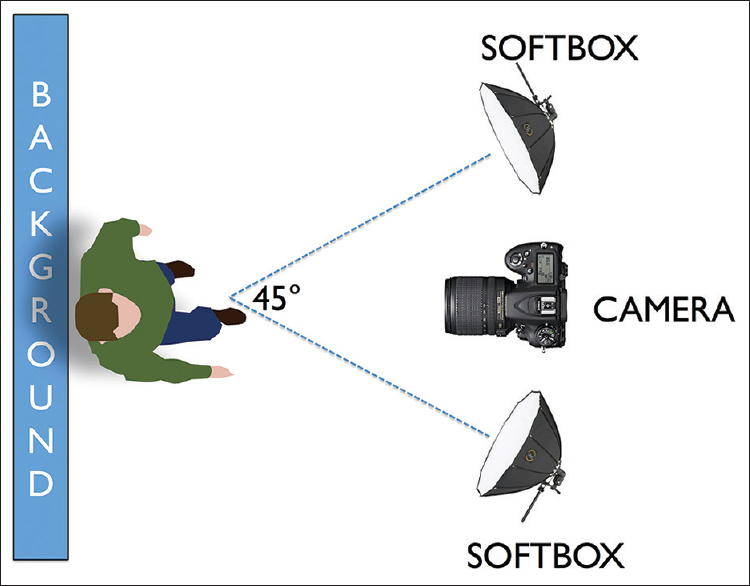
- An overhead view of how a mini photography suite can be set up. A uniform background is required. The camera is placed atop a tripod in a fixed position. Note the 45° angulation between the two soft boxes
PATIENT POSITION
Most external photographs are taken in the patient in anatomical position, unless the object of interest is hidden in that position. A set of five photographs form the absolute essential photographs for any patient who visits a plastic surgeon/cosmetic dermatologist for any facial issue. This set of five photographs form one of the pillars of facial photography and are a must at every consultation. Nirmal et al. have reported the use of a device that allows the patient to rest his/her chin on a platform and the camera that is fixed at a pre-determined distance allows for uniformity. This device although useful in maintaining the reproducibility of the images, may not be the ideal technique as illumination is poor and the neck position is not natural, with the patient having to hunch his/her back and extend the neck thereby distorting the actual facial anatomy.[7] Sommer and Mendelsohn have reported that small variations in positioning of the neck can affect photographic interpretation; such as neck extension or head protrusion and can seemingly improve jawline and reduce the appearance of submental soft tissue.[2]
The patient must be asked to sit normally on the chair or stool provided. Patients should be positioned at least one foot in front of the background.[6] The seating should have no recline and the patient's hands should be on his/her knees.
Frontal view
From the upper limit of the head to the ‘jugular incisure,’ with the patient looking at the camera. The Frankfurt Plane is a plane passing through the inferior orbital margin and the upper margin of each ear canal or external auditory meatus. This plane is chosen because the inferior orbital rim is an easily palpable bony landmark that can be easily identified. Using a grid display in the viewfinder of the camera can help in obtaining the proper Frankfurt plane [Figure 6].

- (From left to right) – left lateral, left oblique, frontal view, right oblique, left lateral
Oblique view (right and left)
From the frontal view, the patient's body is turned 45° to the photographer and he/she is asked to look straight ahead. A narrow strip of cheek to set off the nose from the background must be left. In this case too, the Frankfurt plane is held horizontal and the patient looks ahead. A common mistake that may be committed while clicking the oblique view is asking the patient to turn his/her face 45° and shooting the photos. This is incorrect as the patient's whole body must be turned 45° to the photographer and photographs must be captured on both sides such that the right and the left sides are documented [Figure 6].
Lateral view (right and left)
From the frontal view, with the patient's whole body rotated 90° so as to align the nasal tip and chin. In this position, the head must be in its anatomic position with no lateral inclination, flexion or extension. The contralateral eyebrow should not be visible. The patient is asked to look straight ahead and images are shot asking the patient to assume a neutral face expression, holding a relaxed and natural head position, unless it is to assess muscular contractions [Figure 6].
SPECIAL CONDITIONS
Facial Rejuvenation – botulinum toxin
Patients often retain more of what they see and less of what they hear.[8] As a result, in demonstrating to the patients the potential sites for botulinum toxin injection for facial rejuvenation, taking the help of patient photographs is extremely helpful. Botulinum injections are used to primarily treat the dynamic creases, which are not prominent in normal photographs that patients are asked to emote, i.e., use the muscle group that will highlight the fine lines and wrinkles:
-
Forehead: For glabellar lines, ask the patient to elevate his/her eyebrows. The frontalis action makes the horizontal creases prominent. This photograph is taken of the entire face in the frontal view
-
Crow's feet: Lateral periorbital rhytids or ‘crow's feet’ result from repeated contraction of the lateral portion of the orbicularis oculi. They are highlighted best in the oblique and the lateral views. The patient may be asked to smile to make the crow's feet prominent. This is one of the scenarios where lighting plays an extremely important role. Extremely bright lights can wash out the fine wrinkles, and they may not appear prominent in the photos
-
Masseter: Botulinum toxin A (BonTA) is injected in the masseter for cases of masseter hypertrophy or for facial or jawline reshaping. The background plays an important role in highlighting the outline of the masseter in the frontal view. Ensure that the background colour is one that is in contrast to the skin colour of the patient such that the face easily offsets against the background and the outline is easily appreciated. Furthermore, ensure that hair, earrings or any other accessory do not come in the way
-
Frown lines: This is again a photograph that is clicked in the frontal view. The patient is asked to frown using his/her eyebrows. The forehead and eyebrows, which is the area of interest may be cropped later on
-
Eyebrows: BonTA is used widely to shape the eyebrows in what are commonly referred to as ‘chemical brow lifts.’ In these cases too, the frontal and the oblique views are photographed
-
Platysma: The frontal view, as mentioned earlier, is supposed to include the head and neck, up to the jugular incisures. This includes the plastymal bands. However, two photographs must be taken: One in a relaxed neutral position and the other with the platysma contracted highlighting the skin bands. The same must be repeated in the lateral views.
To summarise, the frontal view documents many aspects that are often treated while injecting BonTA such as eyebrows, finelines around the eyes (orbicularis), frown lines. This therefore is the most important view that should be documented. In addition, oblique views are requires for crow's feet and eyebrow shaping. The lateral view must be documented before and after treatment of crow's feet and platysmal bands.
Fillers
The frontal and oblique views are sufficient to document the subtle differences before and after filler injections at common sites, namely nasolabial fold, forehead, lips and the tear trough. In some cases of lower lid fat prolapse or deep tear trough deformities, it may be essential to use lower light settings and diffuse light such that the shadows highlight the area. In cases of lip augmentation with fillers, the lateral and frontal views should both in a neutral expression and also one with the patient pouting.
Masses, moles, flat lesions
Macro lenses allow the photographer to shoot close-up photographs of small lesions. In some point-and-shoot cameras, one can choose the macro setting, which is indicated by the ‘flower’ or ‘tulip’ icon. A ring flash is a circular flash that sits around the lens. The advantage of a ring flash is uniform illumination with little or no shadows. Many authors recommend a ring flash while doing close-up photography.
As is always the case, every lesion that is documented must be measured and the photographic parameters must be noted to ensure comparability on subsequent visits.
CROPPING
Cropping of photographs is done to highlight only the area of interest. The advantage of using high-resolution cameras (6 megapixels or higher) is that even cropping photos and zooming in does not cause the photographs to pixelate figure. This is especially relevant while incorporating photographs into brochures, presentations or presentations where it is prudent that the patient's identity is protected and only the treated area on the face is highlighted [Figure 7].
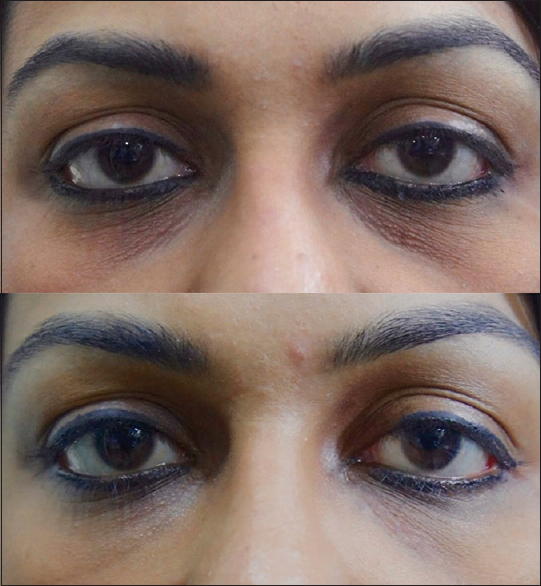
- (Above) a 28-year-old female with dark circles around the eyes and a prominent tear trough deformity. Below is the photograph after treatment with Juvederm (hyaluronic acid). Observe how the only thing that has changed in the two photos is the patient and the treatment; therefore making the change appreciable. Furthermore, only the area of interest has been shown
PROCEDURAL PHOTOGRAPHY/VIDEOGRAPHY
Often times, for documentation or demonstration, a procedure such as botulinum injection or fillers may have to be recorded. Having an assistant record a procedure holding the camera in their hands may not produce a polished result as jittery hand movements can hamper the quality of video. It is best to utilise a tripod affixed with a camera for this purpose. The area to be injected must be well illuminated and the doctor should take care not to obstruct the camera while the procedure is being recorded. More than one light source should be used and preferably, an overhead light source should not be used as it may cast shadows over the area of interest. It may also be worthwhile to use point-of-view, portable cameras that are fastened to the surgeon's head that can offer a unique point of view while treating the patient.[9]
THREE-DIMENSIONAL PHOTOGRAPHY
This is a new aspect of cosmetic surgery that is gaining traction among practitioners. That facial aging is not a two-dimensional phenomenon, but a three-dimensional (3D) process is well known and accepted. Hence, it is believed that merely documenting changes on a two-dimensional photograph may not be ideal. Many companies offer imaging systems with this ability: 3dMD, Axisthree, Canfield, Crisalix and Dimensional Imaging (Di3d).[10]
Vectra H1 is one such popular imaging system manufactured and marketed by Canfield Scientific, Inc., Fairfield, New Jersey, USA. In this, a light-weight handheld 3D camera that includes integrated flash and ranging lights is used to procure three facial captures. Photographs can be captured to the camera's san disk card, or when tethered to a workstation directly into the patient chart. The facial images are automatically stitched into a single 3D image with the proprietaryVectra software. This 3D image processing software also allows the clinician to evaluate contours without colour distraction, quantify subsurface skin conditions such pigmentation, assess volume difference – before and after procedures and finally communicate the complete plan in 3D. Given the high costs and maintenance, potential users should first define their requirements and assignment of 3D surface-imaging systems in their clinical as research environment before making the final decision for purchase.[11]
ARCHIVING
This is the most time consuming and tedious part of clinical photography. There is however, no doubt, that archiving and classifying clinical photos is the most crucial part of clinical photography. Unless meticulous archiving is done, it becomes difficult to retrieve photographs for comparisons. There are many resources available that can help on archiving photographs such as Cumulus (by Canto), which offers online (cloud based) archiving. There are other photo management software that are far more economical, such as PhotoDirector (CyberLink Corp, Taiwan), ACDSee (ACD Systems, USA) and Magix Software GmBH, Berlin, Germany. They allow the user to categorise date wise; create separate folders for every patient and add customised tagwords. Tagwords allows archiving on the basis of diagnosis; which facilitates easy retrieval. However, archiving is a commitment that takes a lot of time; especially in busy practices. It is extremely important to have a dedicated team that archives photos meticulously and creates back-ups regularly.
SMARTPHONES IN DERMATOLOGY
As a rule, it is advisable not to use a mobile phone to shoot patient photographs, especially facial photographs. Unless absolutely essential, smartphones should not be used as a regular tool for clinical photography mainly due to its technical shortcomings – poor resolution, distortion induced by the lens and illumination issues.[12] Furthermore, often times, such patient images are shared by clinicians with peers using applications such as Whatsapp. This is not without its share of possible medicolegal ramifications as Natarajan and Nair have elucidated.[13] Hsieh et al. reported that the majority of the patients found personal smartphones to be acceptable media for patient information, the majority of patients prefer a hospital-owned camera over the use of personal photographing equipment such as a physician's digital camera or a physician's smartphone camera.[1415]
CONCLUSION
Standardisation is the key to consistent and reproducible photography. Not just physicians, but even patients believe that photography enhances their quality of care and most patients would allow their photographs to be used for medical, teaching, and research purposes.[15] If a standard protocol is set in place, a trained assistant can finish photographing the patient in all the required views in under 3 minutes.[8] Even small variations cause drastic changes in the photos' clinical and research value and unless stringent criteria are met, the photographs lose their relevance and impact. Therefore, a conscious attempt to standardise pre- and post-treatment photography must be made by following the following guidelines:
-
Use the same camera, lens, settings, magnifications, illumination and patient positions at each visit
-
Camera position/distance from the patient has to be uniform, therefore a floor marking deciding the position of the camera is advisable. As is using a tripod to fix the camera so that it is camera position no longer is a variable
-
Post-procedural photographs should be taken only after adequate time has elapsed since the procedure and all oedema, sutures and haematomas have resolved
-
Preferably, the same photographer should take the pictures at every visit after viewing the photographs of the previous visit.
It is not always realistic to use the services of a photographer in the clinic, but with practice based on sound principles, rigorous standardisation and training, clinicians can take good clinical photographs with easy-to-use low cost equipment.[16]
Declaration of patient consent
The authors certify that they have obtained all appropriate patient consent forms. In the form the patient(s) has/have given his/her/their consent for his/her/their images and other clinical information to be reported in the journal. The patients understand that their names and initials will not be published and due efforts will be made to conceal their identity, but anonymity cannot be guaranteed.
Financial support and sponsorship
Nil.
Conflicts of interest
There are no conflicts of interest.
REFERENCES
- Standardized photography for skin surface. Facial Plast Surg Clin North Am. 2011;19:241-6.
- [Google Scholar]
- Pitfalls of nonstandardized photography in facial plastic surgery patients. Plast Reconstr Surg. 2004;114:10-4.
- [Google Scholar]
- Setting up a medical portrait studio. Facial Plast Surg Clin North Am. 2010;18:231-6.
- [Google Scholar]
- Pitfalls of photography for facial resurfacing and rejuvenation procedures. Facial Plast Surg. 2005;21:154-61.
- [Google Scholar]
- Principles and practice of external digital photography in ophthalmology. Indian J Ophthalmol. 2012;60:119-25.
- [Google Scholar]
- A simple instrument designed to provide consistent digital facial images in dermatology. Indian J Dermatol. 2013;58:194-6.
- [Google Scholar]
- Surgeon point-of-view recording: Using a high-definition head-mounted video camera in the operating room. Indian J Ophthalmol. 2015;63:771-4.
- [Google Scholar]
- Three-dimensional analysis of long-term midface volume change after vertical vector deep-plane rhytidectomy. Aesthet Surg J. 2015;35:491-503.
- [Google Scholar]
- Comparison of three-dimensional surface-imaging systems. J Plast Reconstr Aesthet Surg. 2014;67:489-97.
- [Google Scholar]
- Clinical photography in dermatology using smartphones: An overview. Indian Dermatol Online J. 2015;6:158-63.
- [Google Scholar]
- Patient perception on the usage of smartphones for medical photography and for reference in dermatology. Dermatol Surg. 2015;41:149-54.
- [Google Scholar]
- Patient perspectives on medical photography in dermatology. Dermatol Surg. 2014;40:1028-37.
- [Google Scholar]


